.jpg)

Alright. So, Teams. Great tool, but that annoying UI can get the better of you sometimes. You open it up and think – "what the heck is going on here?" We've all been there, clicking around trying to figure things out. Okay, let's just dive in - I'll walk you through this like we're having a chat over coffee (or a beer, who knows).
When you're setting up teams, adding members, creating channels, and just generally getting your team's settings sorted, you need to keep in mind that only certain people can create teams in Microsoft Teams. Typically, it's the admins who control who can create teams, partly to keep things organised and partly for permission management reasons. And if you're on Microsoft 365, you'll know that creating new teams is linked to your Microsoft 365 groups, so you may even need to get approval or have the right to create groups in order to get a new team up and running.
Microsoft 365 and Teams work super well together, of course - think seamless collaboration and easy access to shared resources. These tools are designed to make your life easier, making communication and teamwork more intuitive and personalised. Plus, with the integration of all those other Microsoft services, you get a slick and streamlined user experience that really helps boost productivity and teamwork within your organisation.
Do You Even Have Microsoft 365? (The Prerequisite Nobody Tells You About)
Before you even start thinking about creating a new team in Microsoft Teams, there's one thing that's probably not been mentioned yet - Microsoft 365. If you're not part of an organisation that's already on a Microsoft 365 subscription, then you're going to hit a brick wall. See, Microsoft Teams isn't some free- standing thing - it's all wrapped up in Microsoft 365, and that means you need the subscription if you want to unlock all the good stuff like creating teams, adding members, setting up channels, and managing your team's settings.
Now you're probably wondering why this matters. Well, it's because Microsoft 365 isn't just Teams - it's a whole productivity suite: Word, Excel, PowerPoint, and loads of other services that make your work life slightly less chaotic. So, if you're not sure whether your organisation is already on Microsoft 365, now's the time to go and bug your IT department (or check the Microsoft 365 website for more info). Trust me, it's better to find out now than after you've wasted 20 minutes trying to figure things out.
With Microsoft 365, though, you get access to all the features that actually make Microsoft Teams worth using - you can create a new team, add members, set up channels, and manage your team's settings. Plus, you get integration with all the other Microsoft services, so everything just works together. Security and data management? Covered. Collaboration tools? All good. So before you start creating teams, make sure you're good to go with Microsoft 365 - otherwise, you're just spinning your wheels. One more thing - you can create up to 250 teams per account, which should be plenty to keep your projects and collaborations in order.
Wait, who’s even allowed to make a team?
Not you, probably. Okay, maybe you.
It's not a free-for-all, sadly. If you're just a regular user, no can do. You need the right permissions. Only certain users - the ones with the right roles or admin rights - can create teams. Users and guests, though, tend to be stuck not being able to create teams; admins control all that, basically. Guests? Forget about spinning up teams in someone else's tenant.
So, before you start clicking around, make sure you actually have the right and follow the right process. If not, you'll end up wasting an hour and emailing IT wondering why it's not working. There's a right way to get the permissions or create a team.
Desktop version: step-by-step (ish)
Creating new teams in Microsoft Teams is straightforward. Below, we’ll outline the steps to create a team and manage its members. To start, select New items from the list of chats and channels to begin the team creation process.
Okay, permissions sorted? Cool. Let’s make your shiny new team.
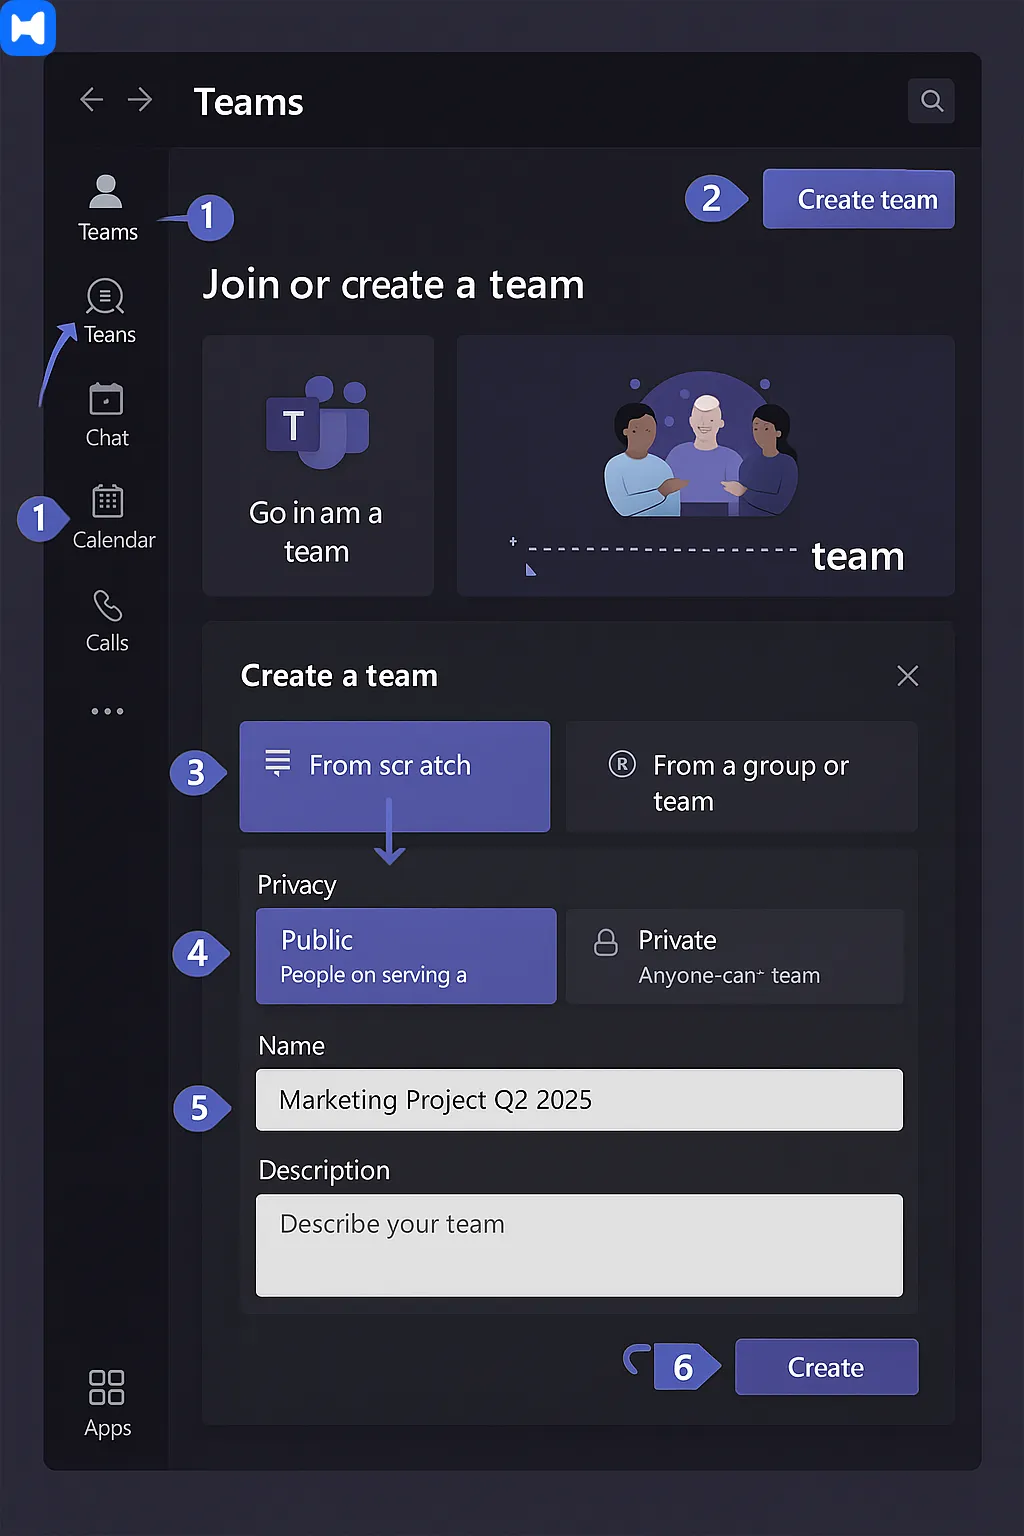
- Go to the Teams tab.
- On your screen, look up to the top right corner - tiny little + button. Yeah, that one you keep missing. Click it.
- Hit Create team.
- Now you gotta select how you want to create your team:
- select start from scratch,
- select an existing Microsoft 365 group (handy if it’s already set up),
- or select a template (fancy word for “preset config” that saves you a headache if you’re doing repeat projects). Templates can include pre-configured channels and apps to streamline specific workflows.
- Decide: public team (anyone can join) or private (invite-only, the VIP club).
- Provide a proper name and a description. (Please don’t call it “Test Team 3”- people hate that.)
- Hit Create. Done.
By default, you’ll see a “General” channel. That’s like the lobby. People can start talking there, post memes, whatever. Members can be added now or later - anyone you add becomes a member of the team.
Teams on your phone (Android vs iPhone chaos)
When creating a team on mobile, you’ll start from the main screen of the Teams app. Below, I’ll outline the steps for creating a team on your device.
On Android:
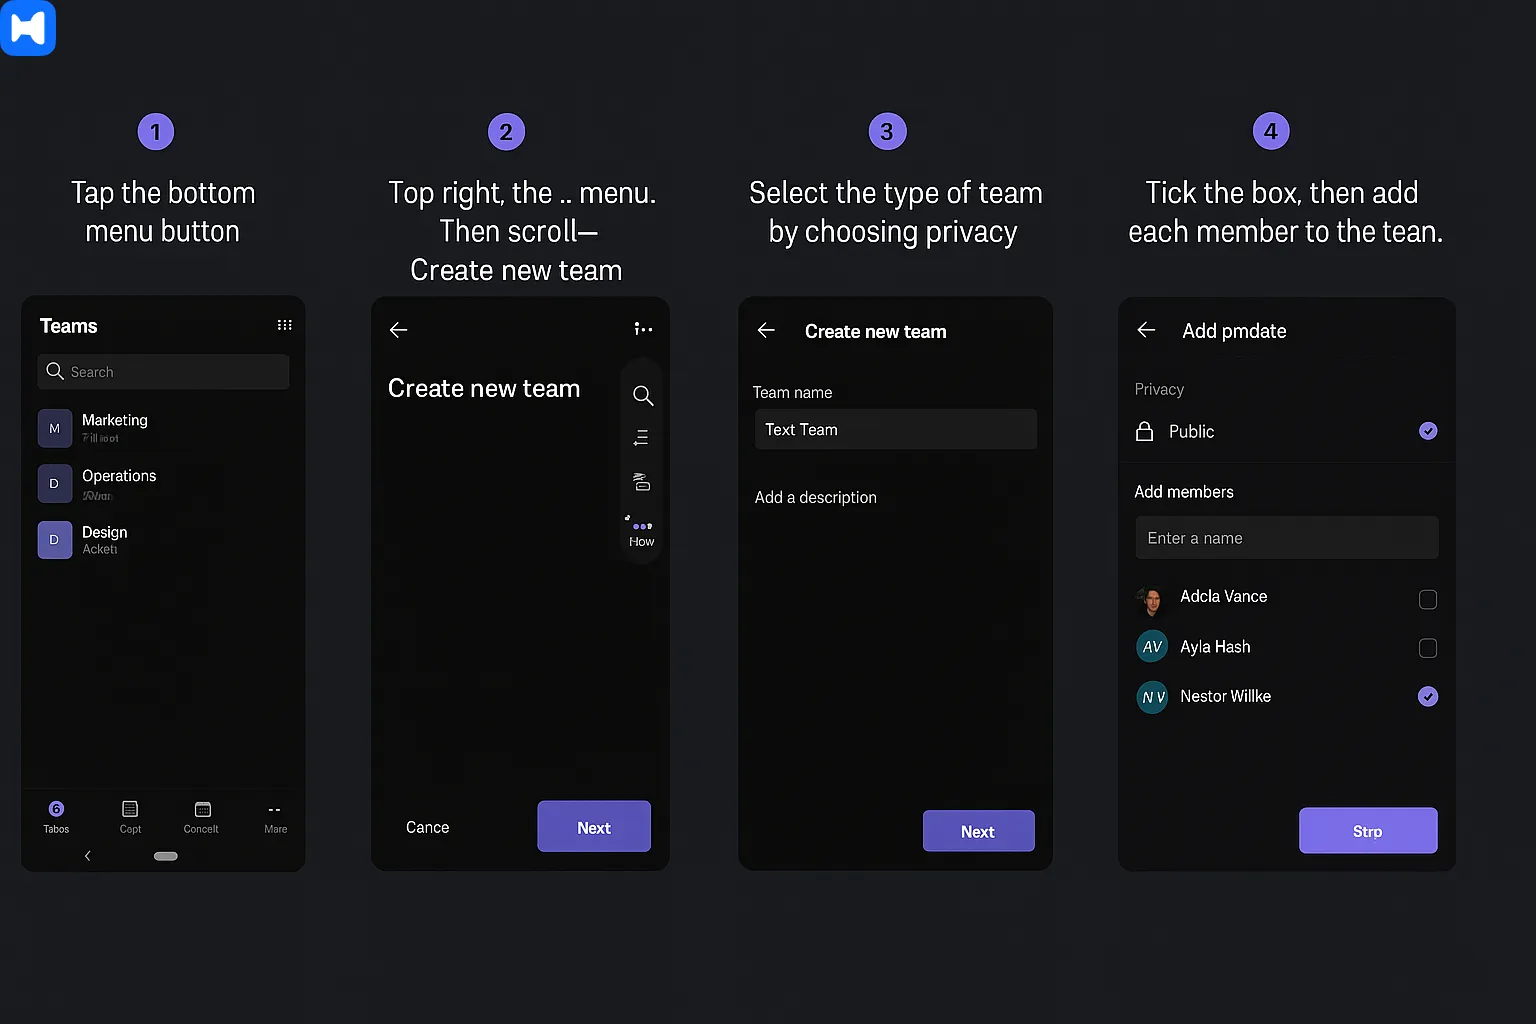
- Tap the bottom menu button.
- Top right, the … menu. Then scroll down - Create new team.
- On the next screen, provide a team name and description.
- Select the type of team by choosing privacy (private/public).
- Tick the box, then add each member to the team. Members can be added during this step. Tick again. Boom. Team made.
On iPhone:
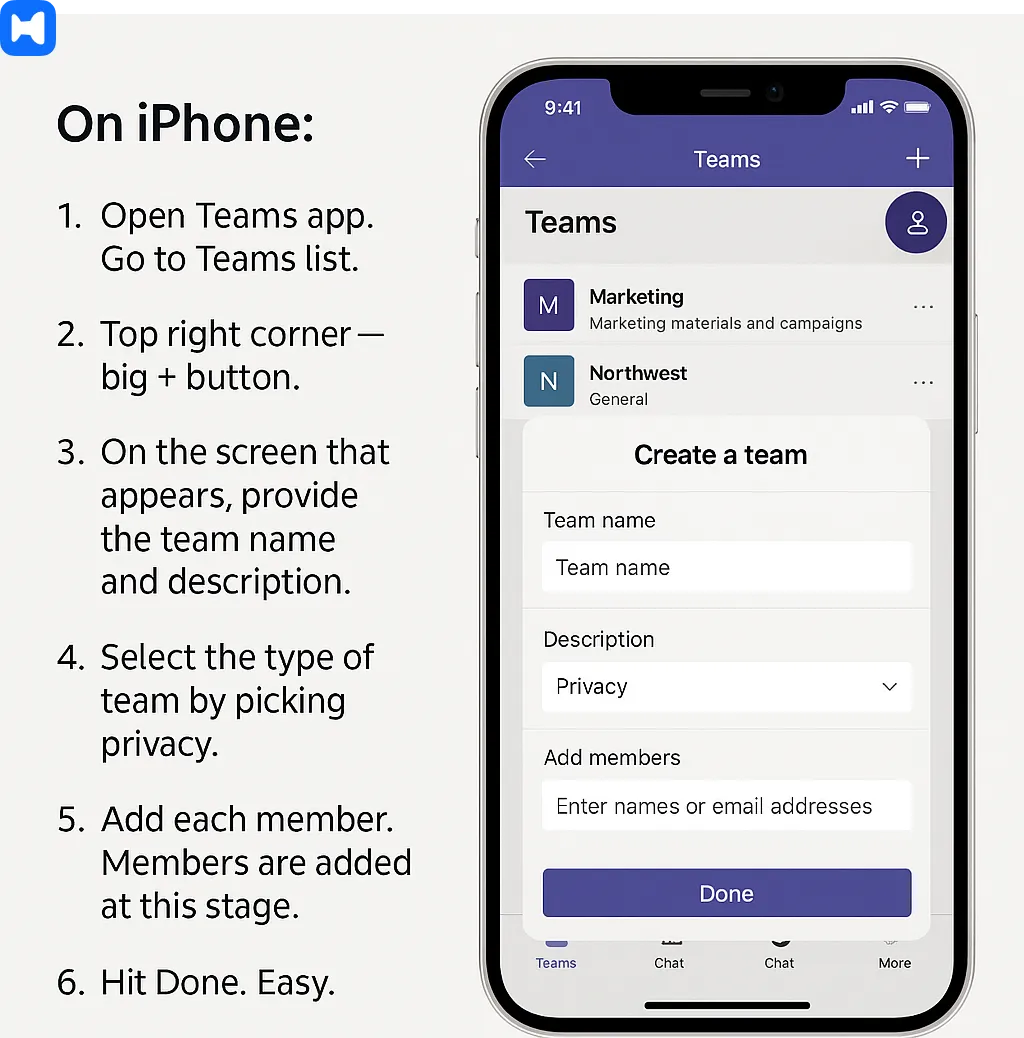
- Open Teams app. Go to Teams list.
- Top right corner - big + button.
- On the screen that appears, provide the team name and description.
- Select the type of team by picking privacy.
- Add each member. Members are added at this stage.
- Hit Done. Easy.
Once it’s alive, you can start making channels so it doesn’t all become one giant messy chat thread (trust me, you want channels).
Configuring Your Team (Settings You’ll Thank Yourself For Later)
Alright, so you've got Microsoft 365, you've created your new team in Microsoft Teams – now what? Time to tidy up so your team doesn't descend into chaos.
First things first – your team name. Don't go for something dull like "Project" or "Team 7". Pick something that actually tells people what your team is about. And don't forget to add a description - that way members know what to expect when they join in. Add a bit of context and it will be super helpful.
Next, think about whether your team is private or public. Private means only invited members can join, public means everyone in your organisation can join in. Not a massive decision but good idea to get it right from the start, because this setting controls who can join in and what kind of content gets shared.
Now channels. "General" is where all your main conversations will go but you want to create separate channels for different topics, projects or departments. Give each channel a name and a quick description - that way people know where to post what and conversations stay on track.
When you add people to your team, you can assign them a role - owner, member or guest (if that's allowed by your organisation). Owners can sort out settings and add new members, members get in on the conversations and have access to files. Sort it out in the team settings to make sure everyone has the right level of access – you don't want people doing things they shouldn't be doing.
Don't forget to play around with other settings, notifications, Microsoft 365 integrations and security options to keep everything safe.
Creating channels (because one chat isn’t enough)
Your new team exists. Congrats. To keep things organized, it's important to add channels for different topics or projects.
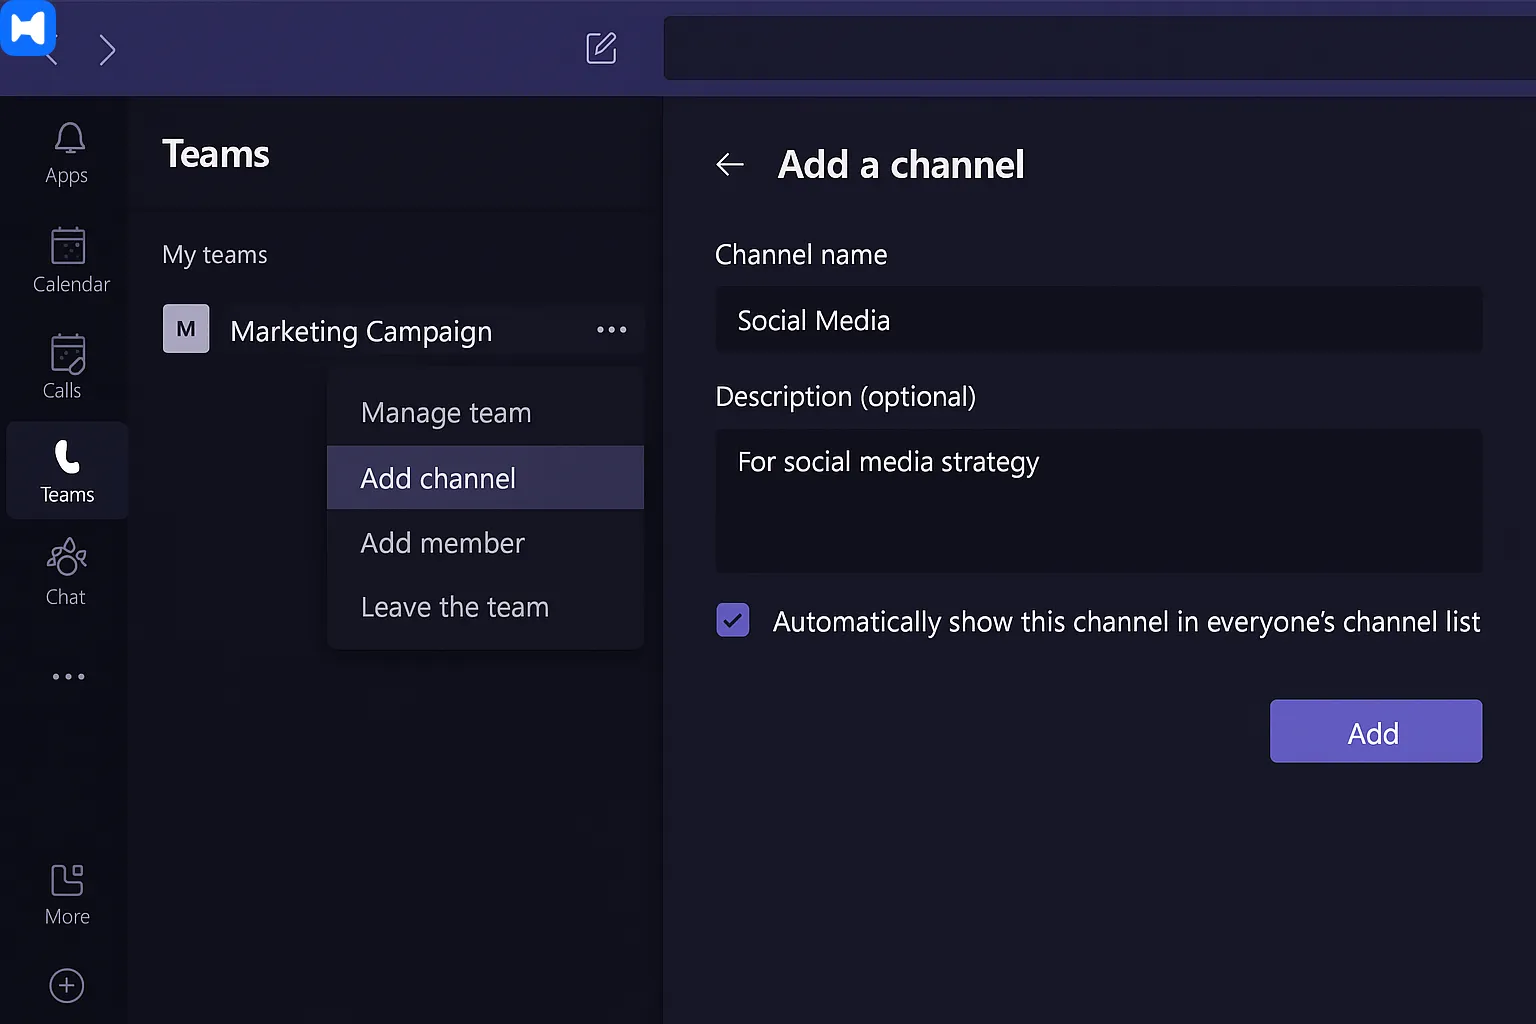
So:
- Go to your team.
- Hit the … menu.
- Choose Add channel to create a new channel.
- Give the new channel a name + description. (Different from the team name, obviously.)
- Once you've started with your first channel, you can continue adding more as needed.
And that’s it. You now have sub-rooms. Order restored.
Organizing your workspace with teams and channels helps everyone stay on track. Team members can also comment within channels to share feedback and keep discussions clear.
Talking to people not on Teams (Google Chat, Zoom, etc.)
Here’s the kicker: not everyone lives in Teams. Shocking, I know. A ton of companies use like two, three different chat apps at once, and users are often spread across Microsoft Teams, Google Chat, and Zoom Team Chat.
So what do you do if half your coworkers are in Google Chat? Or Zoom Team Chat? You don’t wanna juggle five apps, right?
- With federation enabled, you can message Google Chat users straight from Teams. They’ll receive it in Google Chat, you stay in Teams. Emojis, GIFs, files - the whole thing works both ways, and users on both sides can read messages and posts seamlessly.
- Same story with Zoom Team Chat. You can connect Teams ↔ Zoom and send DMs, channel messages, GIFs, edits, even files. Mio is the glue here, ensuring users receive updates and can read all communications across platforms.
Basically, no more “hey, can you jump to email instead?” nonsense.
To learn more about integrating chat platforms and expanding your cross-platform communication, check out additional resources and guides.
Final thought (because I should probably wrap this up)
Setting up a team in Microsoft Teams - not exactly brain surgery. But even so - it's not exactly obvious the first time you try. Once you do it a couple of times - it becomes second nature. The real challenge though isn't just setting up the team in the first place - it's setting it up so that it doesn't descend into chaos straight away. You know, channels, permissions, naming rules - that's where the real fun (and the real frustration) happens.
Anyway, that's it. Go ahead and create your team - and maybe even give it a fun name.


