.jpg)

What is a shared or team calendar and why do teams need one?
A shared calendar is a digital calendar that multiple users can access, ensuring transparency of schedules, deadlines, and meetings across teams.
Shared calendars differ from personal calendars by supporting collaborative permissions such as owner, editor, delegate, and viewer. They are implemented in Microsoft 365 with Outlook and Exchange Online, in Google Workspace with Google Calendar, and in Apple Calendar through iCloud and CalDAV. Shared calendars are essential for distributed teams, resource booking, cross-time-zone collaboration, and coordination of project milestones.
How is a shared calendar different from a personal calendar?
A shared calendar allows multiple people to access the same events, while a personal calendar is managed by a single user.
In Outlook, a personal calendar remains private unless explicitly delegated, whereas a shared calendar is created for group use in Exchange Online. Google Calendar personal accounts offer basic sharing but without compliance controls, while Google Workspace provides domain-level calendars. Apple iCloud calendars can be shared among family members or small groups, but lack enterprise features such as retention policies or conditional access.
What is the difference between shared, group, team, and delegated calendars?
Shared calendars are manually created, group calendars belong to Microsoft 365 Groups, team calendars are collaborative schedules, and delegated calendars give one user control over another’s calendar.
Microsoft 365 creates group calendars automatically when a group or team is set up. Shared calendars are flexible for ad hoc projects. Delegated calendars are critical for executives whose assistants manage schedules. Google Calendar uses organizational groups to assign calendars, while Apple Calendar supports small-scale sharing via iCloud.
What are the main benefits of using a shared calendar for planning?
Shared calendars improve coordination, reduce scheduling conflicts, and provide visibility across projects and teams.
Benefits include free/busy availability in Microsoft 365 and Outlook, role-based permissions in Google Workspace, and cross-platform syncing with CalDAV and ICS. Integration with Microsoft Teams, Slack, Zoom, and Google Meet enhances collaboration. Governance practices like naming conventions, color coding, and auditing increase adoption and reduce overload.
How do you create a shared calendar in Outlook (Microsoft 365)?
Outlook shared calendars can be created either as blank calendars or automatically through Microsoft 365 Groups.
They are stored in Exchange Online and synchronize across Outlook desktop, Outlook on the web, and mobile devices via Exchange ActiveSync. Permissions are managed centrally in Microsoft 365 Admin Center or by the calendar owner.
How do you create a shared calendar in Outlook desktop?
In Outlook desktop, you create a shared calendar by adding a blank calendar and assigning permissions.
Step-by-step instructions (Outlook Desktop):
- Open Outlook and switch to Calendar view.
- In the ribbon, select Add Calendar → Create New Blank Calendar.
- Enter a name and choose its mailbox location.
- Right-click the new calendar, select Properties, and open the Permissions tab.
- Add users or groups, assign roles (e.g., Can view when I’m busy, Can edit, Delegate).
- Save changes - the calendar syncs across all Outlook clients.
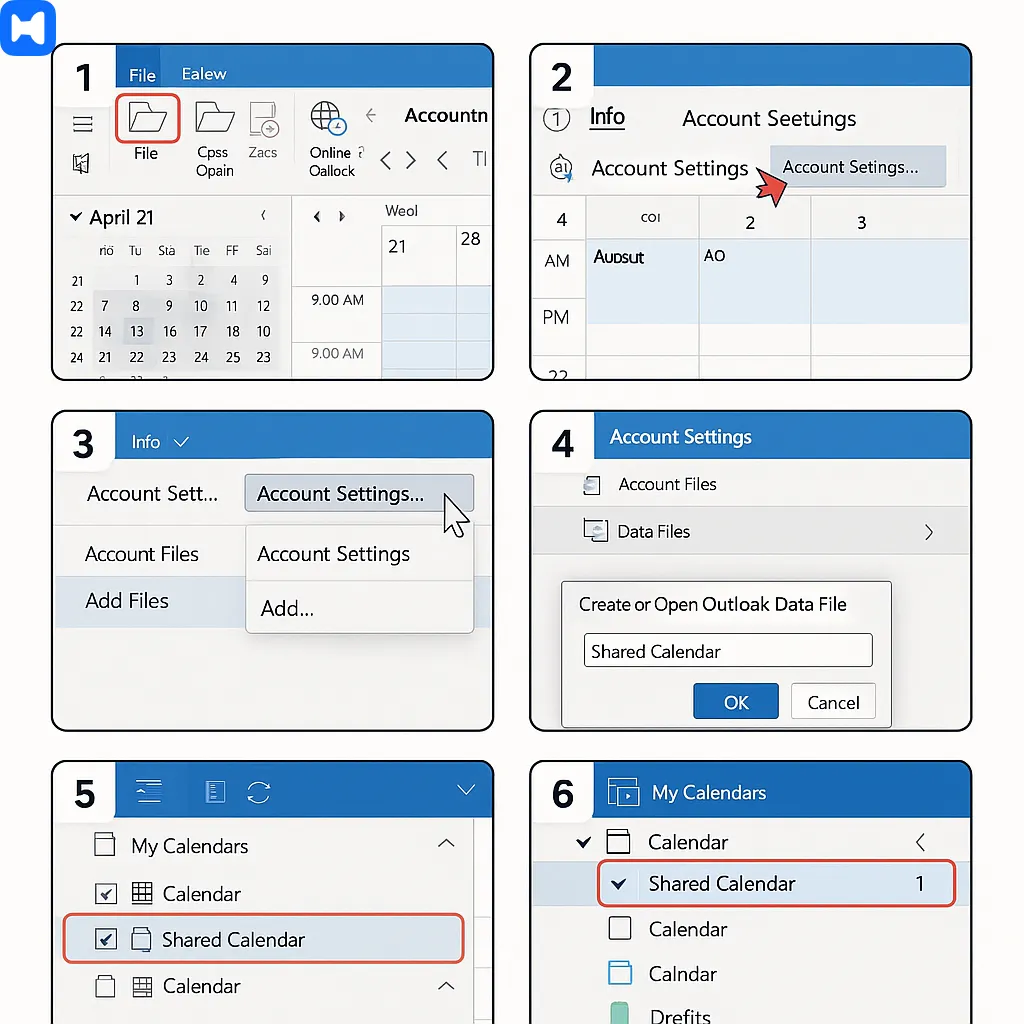
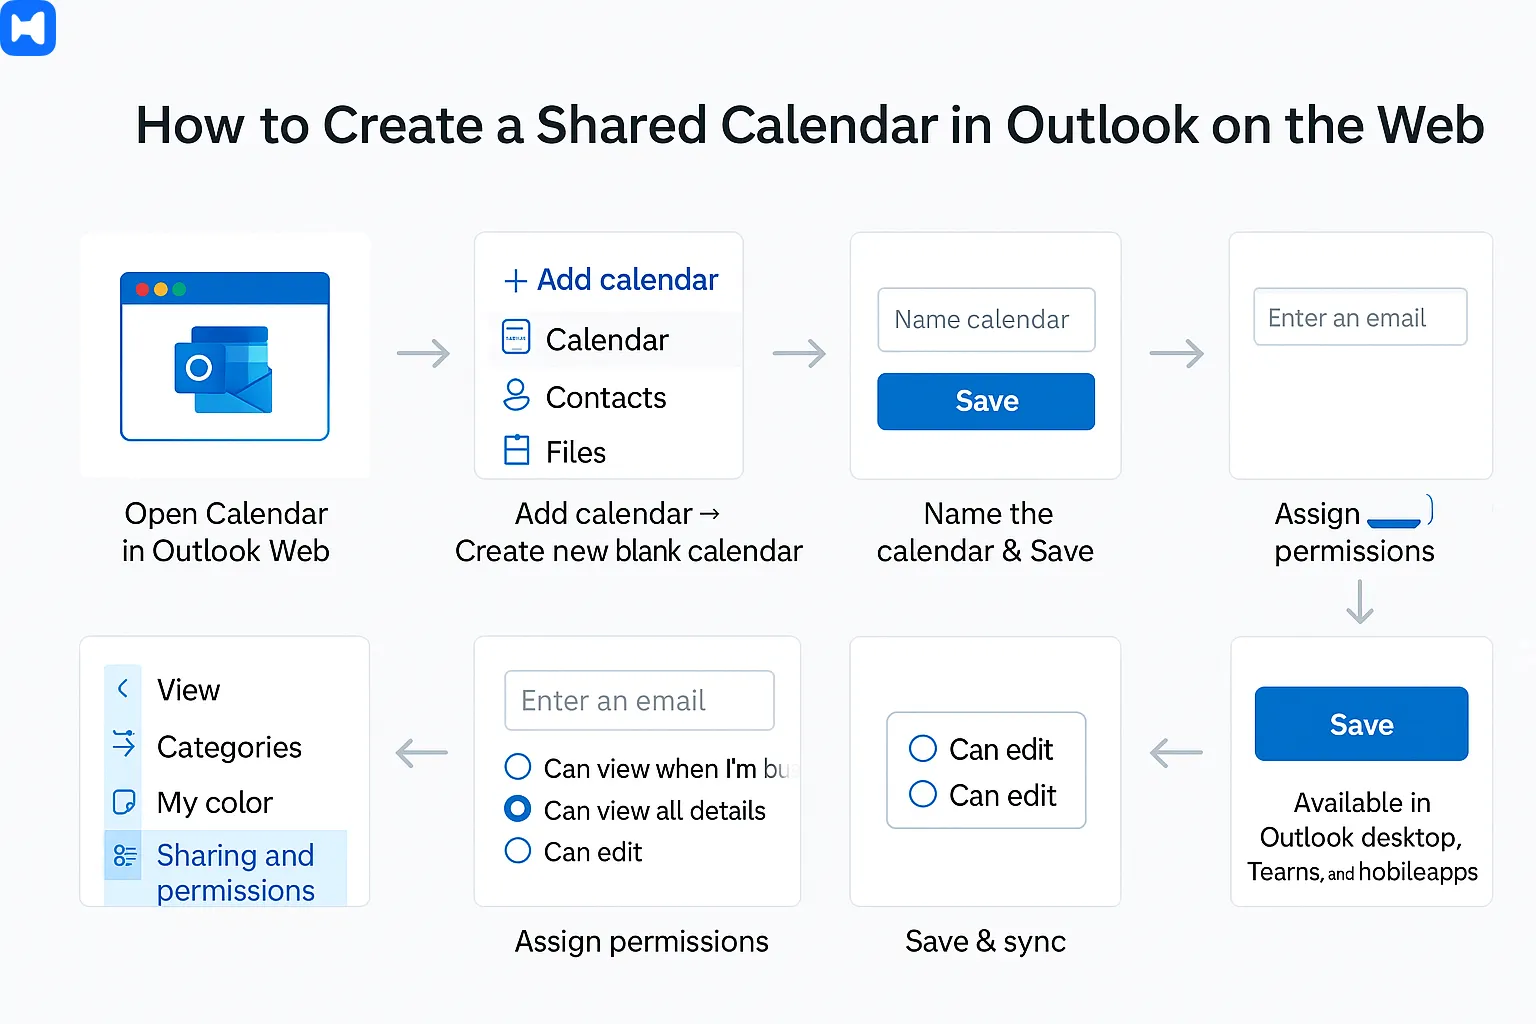
How do you create a shared calendar in Outlook on the web?
In Outlook on the web, you create a shared calendar through Add Calendar and Sharing and permissions.
Step-by-step instructions (Outlook Web):
- Go to Outlook on the web and open the Calendar module.
- Select Add calendar → Create new blank calendar.
- Name the calendar and save it.
- Select the calendar, click Sharing and permissions.
- Enter email addresses of users or groups.
- Assign rights such as Can view when I’m busy, Can view all details, Can edit.
- Save - the shared calendar is available in Outlook desktop, Teams, and mobile apps.
What is the difference between a shared calendar and a group calendar in Outlook?
Shared calendars are manually created and assigned, while group calendars are tied to Microsoft 365 Groups.
Step-by-step instructions (Group Calendar):
- In Outlook on the web, go to People → New Group.
- Enter the group name, description, and add members.
- Save - Exchange Online automatically creates a group calendar.
- Access the group calendar in Outlook desktop, Outlook on the web, or Microsoft Teams.
Why might a shared Outlook calendar not show up or sync?
Outlook calendars may not sync due to cache corruption, permission errors, or Exchange ActiveSync issues.
Step-by-step troubleshooting (Outlook sync issues):
- Verify sharing permissions in Outlook on the web.
- In Outlook desktop, clear the OST cache by closing Outlook and deleting the local cache file.
- Re-add the calendar under Add Calendar → From Address Book.
- On iOS/Android, remove and re-add the Microsoft 365 account with Exchange ActiveSync enabled.
- For enterprise users, check Microsoft 365 Admin Center for RBAC or conditional access policies.
How do you create and share a calendar in Google Calendar?
Google Calendar allows creating a new calendar and sharing it with individuals, groups, or entire domains.
It integrates with Gmail, Google Meet, and Android Calendar, and administrators in Google Workspace enforce sharing policies through the Admin Console.
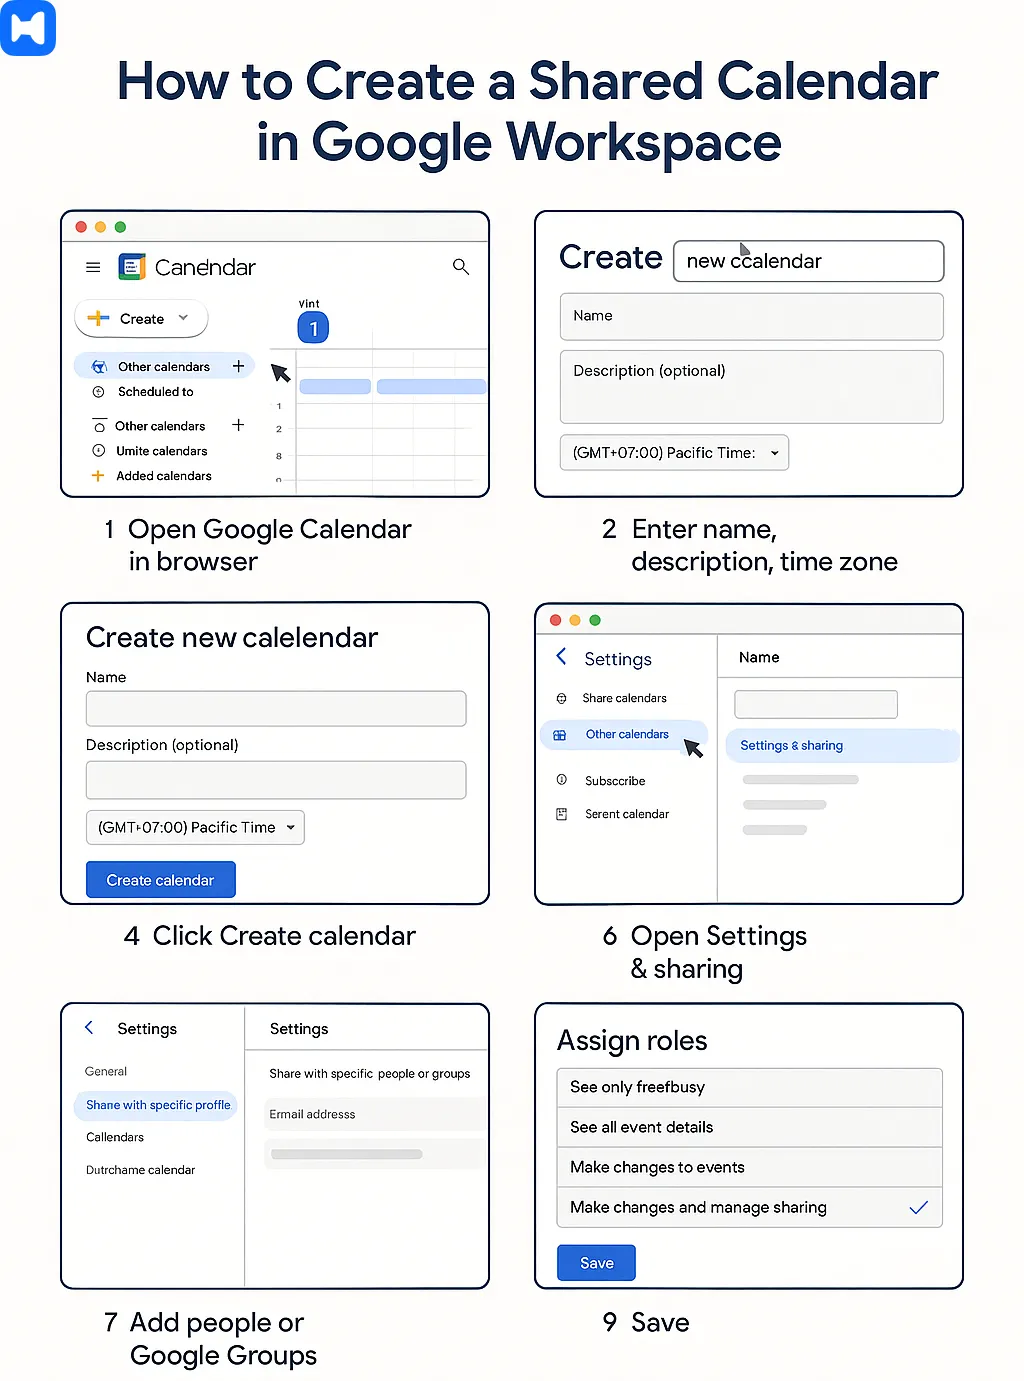
How do you create a shared calendar in Google Workspace?
A new Google Calendar can be created under “Other calendars” and shared via Settings and sharing.
Step-by-step instructions (Google Calendar Web):
- Open Google Calendar in a browser.
- On the left, click the + next to Other calendars.
- Choose Create new calendar.
- Enter a name, description, and time zone.
- Click Create calendar.
- Open Settings and sharing for the new calendar.
- Under Share with specific people or groups, add users or Google Groups.
- Assign roles: See only free/busy, See all event details, Make changes to events, or Make changes and manage sharing.
- Save - the calendar appears for all invited users.
What are the permission levels in Google Calendar?
Google Calendar roles include free/busy, view details, edit events, and manage sharing.
These permissions align with Outlook’s viewer, editor, delegate, and owner. They balance collaboration with privacy and can be enforced domain-wide in Google Workspace Admin Console.
Why is my shared Google Calendar not showing on iPhone or Android?
Shared Google Calendars may fail to display on mobile if sync is disabled or outdated.
Step-by-step instructions (Mobile sync fixes):
On iOS: Install the Google Calendar app and sign in; open the app’s menu, ensure the shared calendar is selected. For native iOS Calendar, add the Google account under Settings → Accounts → Add Account → Google and enable Calendars.
On Android: Open the Google Calendar app, go to Settings, select the account, enable sync for the shared calendar. If issues persist, clear the app cache or update the app.
How do calendar permissions and privacy settings work?
Calendar permissions define what each user can do, while privacy settings control how much detail is exposed, balancing collaboration and confidentiality.
In Microsoft 365 with Outlook and Exchange Online, permissions are based on roles such as owner, editor, delegate, and viewer. Google Calendar in Google Workspace provides four main levels: free/busy only, view all event details, make changes to events, and make changes with sharing. Apple Calendar with iCloud supports basic sharing and delegation through CalDAV, but lacks enterprise governance features like Data Loss Prevention (DLP) or retention policies. Enterprise administrators in Microsoft 365 Admin Center and Google Workspace Admin Console often enforce organization-wide rules to prevent oversharing sensitive data and to align with compliance standards such as GDPR.
What roles exist (owner, editor, delegate, viewer)?
Calendar roles define scope of actions, from full ownership to read-only access.
Owners in Outlook can add or remove users, edit events, and delegate control. Editors can create, modify, and delete events but cannot change permissions. Delegates in Outlook desktop and Outlook on the web manage calendars on behalf of executives, including sending meeting requests. Viewers have read-only access, either to full details or free/busy only. Google Calendar aligns these roles: “Make changes and manage sharing” is equivalent to owner, “Make changes to events” matches editor, and “See all details” or “See only free/busy” correspond to viewer levels. In Apple Calendar (iCloud), owners can share calendars with invitees as viewers or editors, though advanced delegation is limited.
Step-by-step instructions (assigning roles in Outlook):
- Open Outlook desktop and switch to Calendar view.
- Right-click the calendar, select Properties, then go to Permissions.
- Click Add, choose a user or group, and confirm.
- Assign the role: Owner, Publishing Editor, Editor, Reviewer, or Delegate.
- Save - the user immediately inherits the defined role through Exchange Online.
Step-by-step instructions (assigning roles in Google Calendar):
- Open Google Calendar in a browser.
- Click on the calendar name, then select Settings and sharing.
- Under Share with specific people or groups, add an email address.
- Choose the role: See only free/busy, See all event details, Make changes to events, or Make changes and manage sharing.
- Save - permissions propagate across Google Workspace accounts.
How do free/busy permissions protect privacy?
Free/busy permissions display availability without revealing event details, preventing accidental data exposure.
In Microsoft 365, free/busy is often the default level for external users in Outlook, visible in Scheduling Assistant and Microsoft Teams. In Google Workspace, administrators can set free/busy as the maximum visibility for external domains through Admin Console policies. Apple Calendar also supports free/busy when subscribing via CalDAV. These restrictions allow scheduling while safeguarding confidential event data such as meeting titles, agendas, or attachments.
Step-by-step instructions (configure free/busy in Outlook):
- Open Outlook on the web, navigate to the calendar.
- Click Sharing and permissions, select a user outside your domain.
- Assign Can view when I’m busy.
- Save - the external user sees only availability blocks, not details.
Step-by-step instructions (configure free/busy in Google Workspace):
- Open Google Workspace Admin Console.
- Go to Apps → Google Workspace → Calendar → Sharing settings.
- Under External sharing options for primary calendars, choose Only free/busy information (hide event details).
- Save - domain-wide policy is enforced immediately.
How do you remove access when employees leave a company?
Access is removed by revoking permissions or disabling accounts in Microsoft 365 or Google Workspace.
In Microsoft 365, Exchange Online administrators remove users from Microsoft 365 Groups and revoke delegate permissions through PowerShell or Admin Center. Google Workspace administrators suspend or delete the account, reassign calendar ownership, and ensure delegates are removed. Apple iCloud calendars automatically lose access when the Apple ID is disabled, but enterprise governance typically relies on MDM (Mobile Device Management) enforcement.
Step-by-step instructions (Outlook/Exchange Online):
- Open Microsoft 365 Admin Center.
- Remove the departing employee from all Microsoft 365 Groups.
- In Exchange Admin Center, open the mailbox calendar properties.
- Remove the user from the Permissions list.
- If the employee owned shared calendars, reassign ownership to another user.
Step-by-step instructions (Google Workspace):
- Open Admin Console.
- Navigate to Users and select the employee.
- Choose Suspend account or Delete account.
- Transfer ownership of domain-created calendars to another user using Data migration → Calendar transfer.
- Verify that the account is no longer listed under shared calendars.
How can you share calendars across platforms (Outlook, Google, Apple)?
Cross-platform calendar sharing is achieved with ICS for one-way publishing and CalDAV for two-way synchronization across Outlook, Google Calendar, Apple Calendar, and Android.
Outlook in Microsoft 365 allows publishing calendars as ICS links via Exchange Online. Google Calendar supports ICS export and subscription, and Apple Calendar uses CalDAV as its native sync protocol. Exchange ActiveSync (EAS) is used by Outlook and many mobile clients for real-time sync, while iTIP/iMIP standards define the structure for invitations between systems. Cloud synchronization ensures consistency across Windows, macOS, iOS, and Android devices.
What is an ICS file and how do you use it?
ICS is a standardized calendar file format that enables one-way sharing of calendar events across different platforms.
ICS files are widely supported by Outlook, Google Calendar, Apple Calendar, and most Android clients. They provide read-only subscriptions, useful for public events, company-wide holidays, or academic schedules. Unlike CalDAV, ICS does not allow editing by subscribers.
Step-by-step instructions (Publish ICS in Outlook):
- Open Outlook on the web.
- Go to Settings → View all Outlook settings → Calendar → Shared calendars.
- Under Publish a calendar, select the calendar you want to share.
- Choose permissions: Can view when I’m busy or Can view all details.
- Copy the ICS link and share it with recipients.
- To revoke access, return to the same menu and stop publishing.
Step-by-step instructions (Subscribe to ICS in Google Calendar):
- Open Google Calendar in a browser.
- In the left panel, click the + next to “Other calendars”.
- Select From URL.
- Paste the Outlook ICS link.
- Click Add calendar - events will appear in your calendar list.
Step-by-step instructions (Subscribe to ICS in Apple Calendar):
- Open Calendar on macOS.
- From the menu, select File → New Calendar Subscription.
- Paste the ICS link.
- Choose auto-refresh interval (e.g., every hour).
- Save - events sync via iCloud to all iOS/macOS devices.
What is CalDAV and when do you need it?
CalDAV is an Internet protocol for two-way synchronization of calendars across servers and clients.
Apple Calendar and iCloud use CalDAV as their primary sync technology. Google Calendar provides CalDAV endpoints for external apps, though its official apps rely on proprietary Google Sync. Exchange Online traditionally uses Exchange ActiveSync (EAS), but CalDAV can be used to bridge open-source clients or academic systems with Outlook and Google Calendar. CalDAV is required when users need continuous bi-directional editing instead of read-only access via ICS.
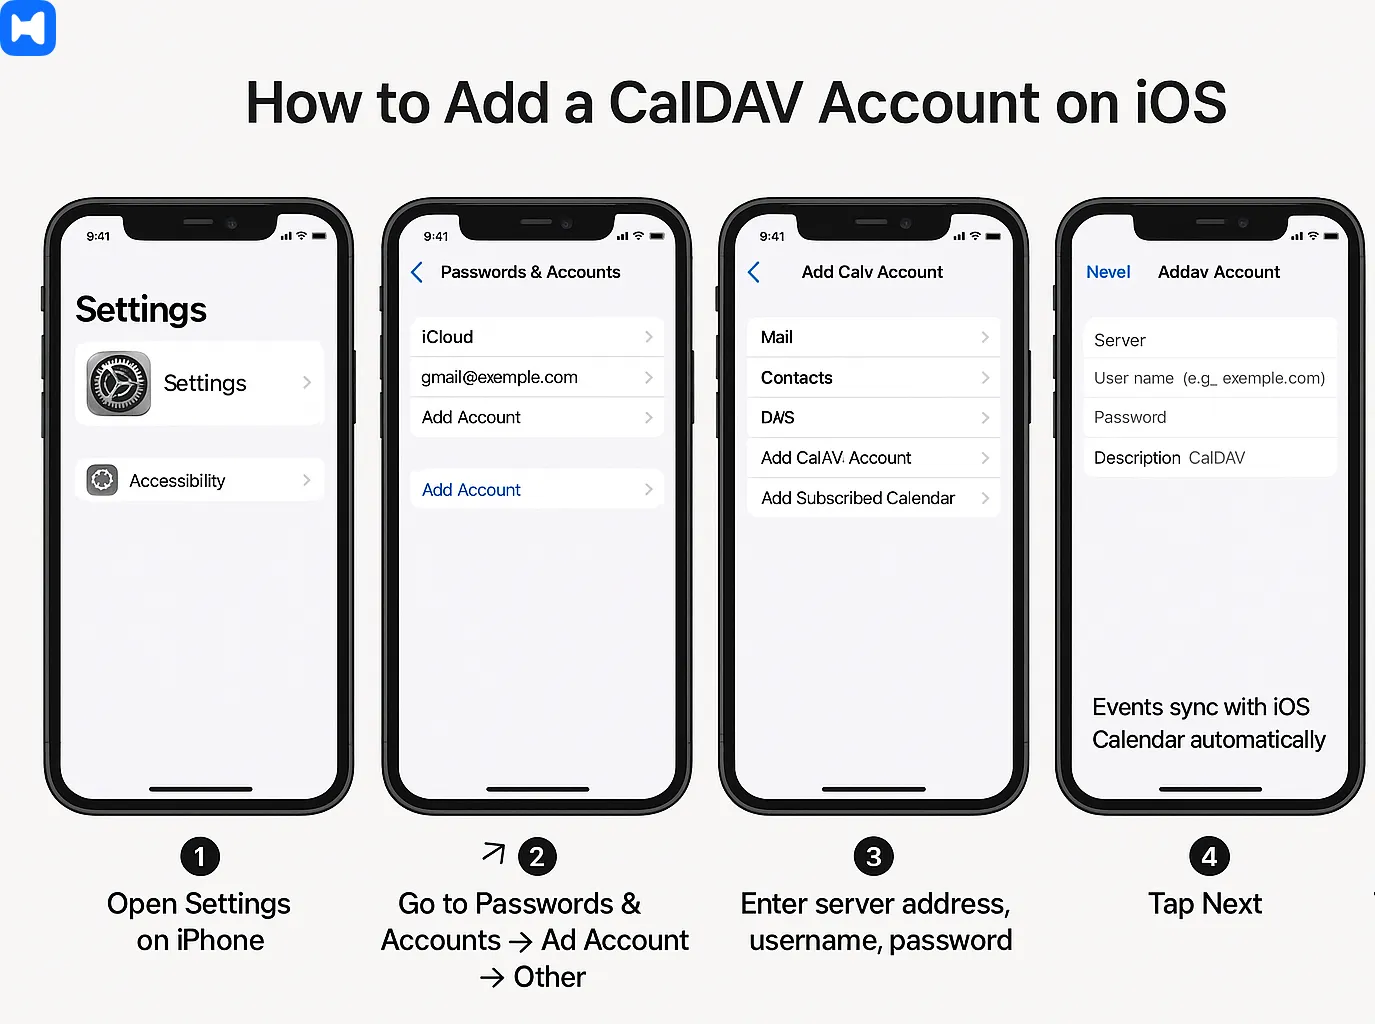
Step-by-step instructions (Add CalDAV account on iOS):
- Open Settings on iPhone.
- Go to Passwords & Accounts → Add Account → Other.
- Choose Add CalDAV Account.
- Enter server address (e.g., Google CalDAV endpoint or iCloud server), username, and password.
- Tap Next - events begin syncing with the native iOS Calendar.
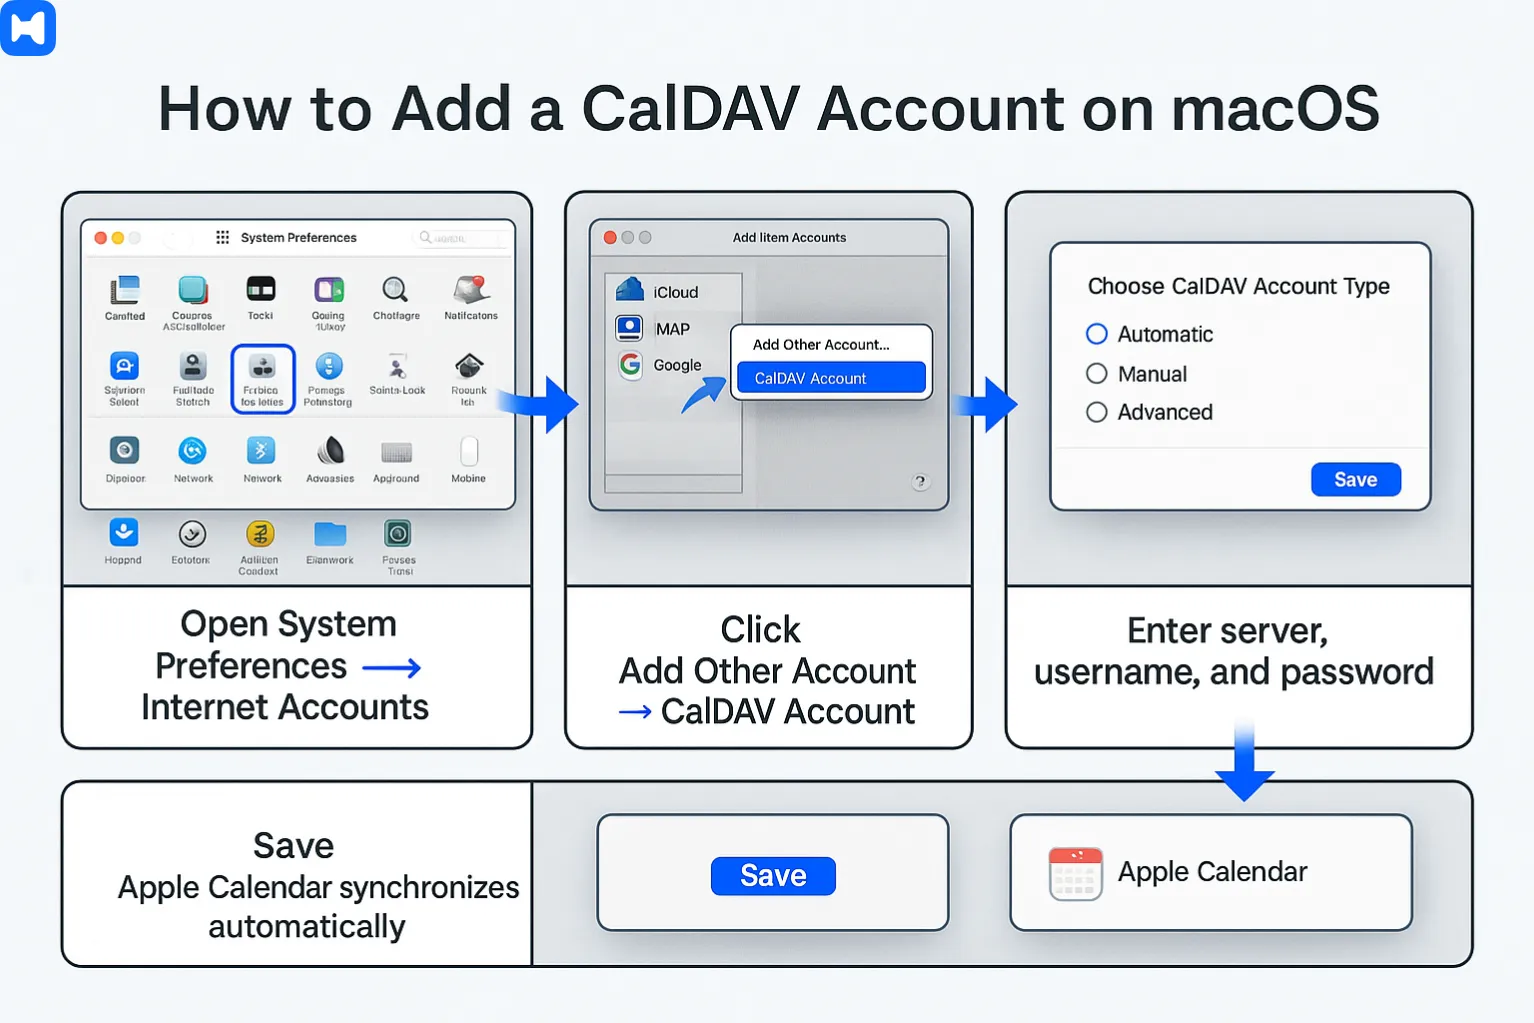
Step-by-step instructions (Add CalDAV account on macOS):
- Open System Preferences → Internet Accounts.
- Click Add Other Account → CalDAV account.
- Select account type: Automatic, Manual, or Advanced.
- Enter server, username, and password.
- Save - Apple Calendar synchronizes automatically.
How do you subscribe to a shared calendar on iOS or Android?
Shared calendars can be added to iOS via ICS or CalDAV and to Android via Google Calendar sync settings.
On iOS, both ICS subscriptions and CalDAV accounts are supported. On Android, Google Calendar handles subscriptions via the web interface and syncs them to the app. Exchange ActiveSync (EAS) is also supported on both platforms for Outlook integration.

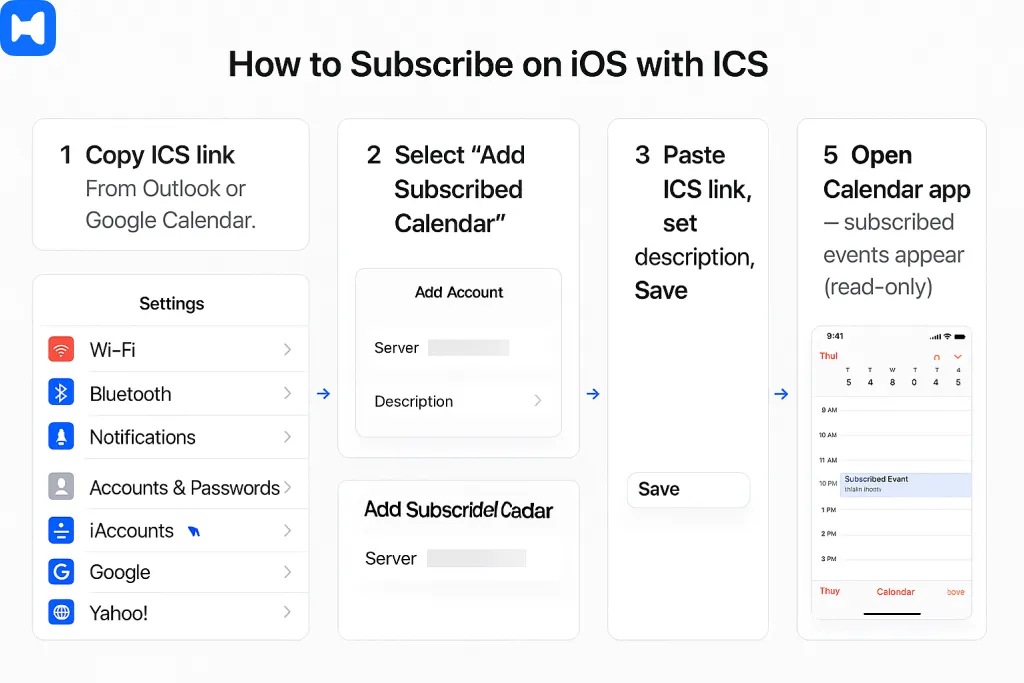
Step-by-step instructions (Subscribe on iOS with ICS):
- Copy the ICS link from Outlook or Google Calendar.
- On iPhone, open Settings → Accounts & Passwords → Add Account → Other.
- Select Add Subscribed Calendar.
- Paste the ICS link, set description, and save.
- Open the Calendar app - subscribed events appear in read-only mode.
Step-by-step instructions (Subscribe on Android via Google Calendar):
- Open Google Calendar in a browser on desktop.
- Click the + next to “Other calendars” → From URL.
- Paste the ICS link and add the calendar.
- Open the Google Calendar app on Android.
- Ensure the new calendar is enabled in Settings → Sync.

Step-by-step instructions (Add Outlook account with EAS on iOS/Android):
- Open device Settings → Accounts → Add Account.
- Choose Microsoft Exchange/Outlook.
- Enter email address and password.
- Ensure Sync Calendar is enabled.
- Save - Outlook calendars sync to native apps via Exchange ActiveSync.
How do shared calendars integrate with collaboration tools?
Shared calendars integrate with collaboration platforms to automate scheduling, embed conferencing links, and deliver reminders inside tools like Teams, Slack, and Zoom.
Outlook calendars in Microsoft 365 are natively connected to Microsoft Teams through Exchange Online. Google Calendar integrates directly with Google Meet and can be linked to Slack for event reminders. Zoom and Cisco Webex provide add-ins for Outlook and Google Calendar, embedding conferencing links into events. Workflow automation is achieved through Power Automate or Zapier, connecting calendars to CRM platforms (Salesforce, HubSpot), project managers (Asana, Trello, ClickUp, Monday.com), and communication apps.
How do you connect calendars with Microsoft Teams?
Microsoft Teams uses calendars from Outlook and Exchange Online to schedule and manage meetings.
When a meeting is created in Outlook desktop, Outlook on the web, or directly in Teams, the event is synchronized through Exchange Online. Teams adds conferencing details automatically, ensuring participants can join via Teams links. Group calendars created with Microsoft 365 Groups are also visible in Teams.
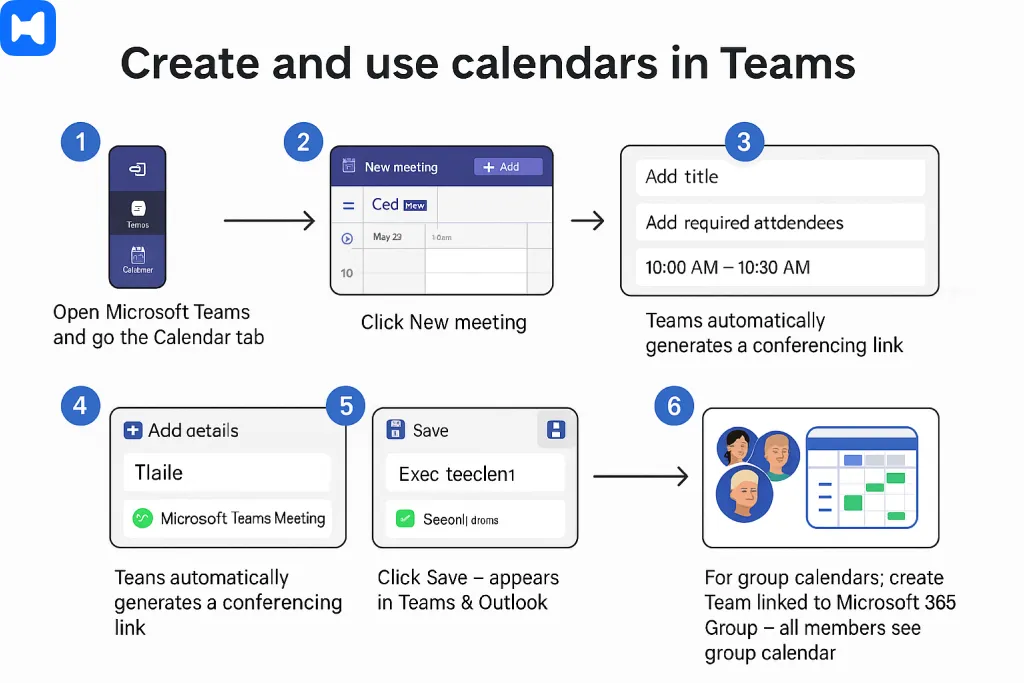
Step-by-step instructions (Create and use calendars in Teams):
- Open Microsoft Teams and go to the Calendar tab.
- Click New meeting.
- Enter meeting details (title, attendees, time, location).
- Teams automatically generates a conferencing link.
- Click Save - the event appears in both Teams and Outlook calendars.
- For shared group calendars, create a Team linked to a Microsoft 365 Group - all members see the group calendar.
How do you connect shared calendars with Slack?
Slack connects with Google Calendar and Outlook Calendar through dedicated apps that push events and reminders into channels.
Google Calendar for Slack posts updates for upcoming events, cancellations, or changes. Outlook Calendar for Slack integrates with Exchange Online and delivers reminders, availability updates, and Teams or Zoom join links.
Step-by-step instructions (Google Calendar in Slack):
- In Slack, open the App Directory.
- Search for Google Calendar and click Add.
- Connect your Google account and grant permissions.
- Choose a Slack channel for calendar notifications.
- Events, reminders, and updates now post directly into Slack.
Step-by-step instructions (Outlook Calendar in Slack):
- In Slack, open the App Directory.
- Search for Outlook Calendar and click Add.
- Sign in with your Microsoft 365 account.
- Authorize access to Outlook calendars via Exchange Online.
- Configure notification preferences (e.g., event reminders, RSVP requests).
How do you automatically add Zoom or Google Meet links to calendar events?
Zoom and Google Meet conferencing links can be embedded automatically in Outlook or Google Calendar through add-ins and default settings.
In Google Calendar, Meet links are added automatically if configured as the default conferencing provider. Outlook supports Zoom, Webex, and Teams add-ins that insert conferencing details into events.
Step-by-step instructions (Google Calendar + Meet):
- Open Google Calendar in a browser.
- Go to Settings → Event settings.
- Enable Automatically add Google Meet video conferences to events I create.
- Save - all new events will include a Meet link.
Step-by-step instructions (Outlook + Zoom):
- Install the Zoom for Outlook add-in from Microsoft AppSource.
- In Outlook desktop or web, create a new event.
- Click Add a Zoom Meeting in the toolbar.
- Sign in to your Zoom account if prompted.
- Save the event - Zoom link is embedded automatically.
Step-by-step instructions (Outlook + Teams):
- In Outlook desktop or web, create a new event.
- Check Teams Meeting option.
- Save - a Teams conferencing link is generated automatically.
How can you use Power Automate or Zapier for calendar workflows?
Power Automate and Zapier connect calendars to other business apps, automating reminders, task creation, and CRM updates.
Power Automate is part of Microsoft 365 and integrates Outlook calendars with Teams, SharePoint, and Dynamics. Zapier connects Google Calendar, Outlook, and third-party platforms like Trello, Asana, Salesforce, and HubSpot CRM.
Step-by-step instructions (Power Automate with Outlook):
- Open Power Automate (flow.microsoft.com).
- Select Create → Automated cloud flow.
- Choose a trigger, e.g., When a new event is created in Outlook Calendar.
- Add an action, e.g., Post a message in Teams or Create a task in Planner.
- Save and test - workflows now run automatically.
Step-by-step instructions (Zapier with Google Calendar):
- Open Zapier and create a new Zap.
- Select Google Calendar as the trigger app.
- Choose a trigger, e.g., New event created.
- Select an action app, e.g., Asana → Create task or Salesforce → Create lead.
- Connect accounts and map fields (date, description, attendees).
- Save - events now trigger automated actions across apps.
How do shared calendars connect with project management and CRM platforms?
Shared calendars integrate with tools like Asana, Trello, ClickUp, Monday.com, Salesforce, and HubSpot to align tasks, deadlines, and customer meetings.
Google Calendar and Outlook both support integrations that push events into task boards or CRM pipelines. For example, Salesforce and HubSpot provide calendar syncs for client meetings, while Trello, Asana, ClickUp, and Monday.com offer bidirectional sync via Zapier or native connectors.
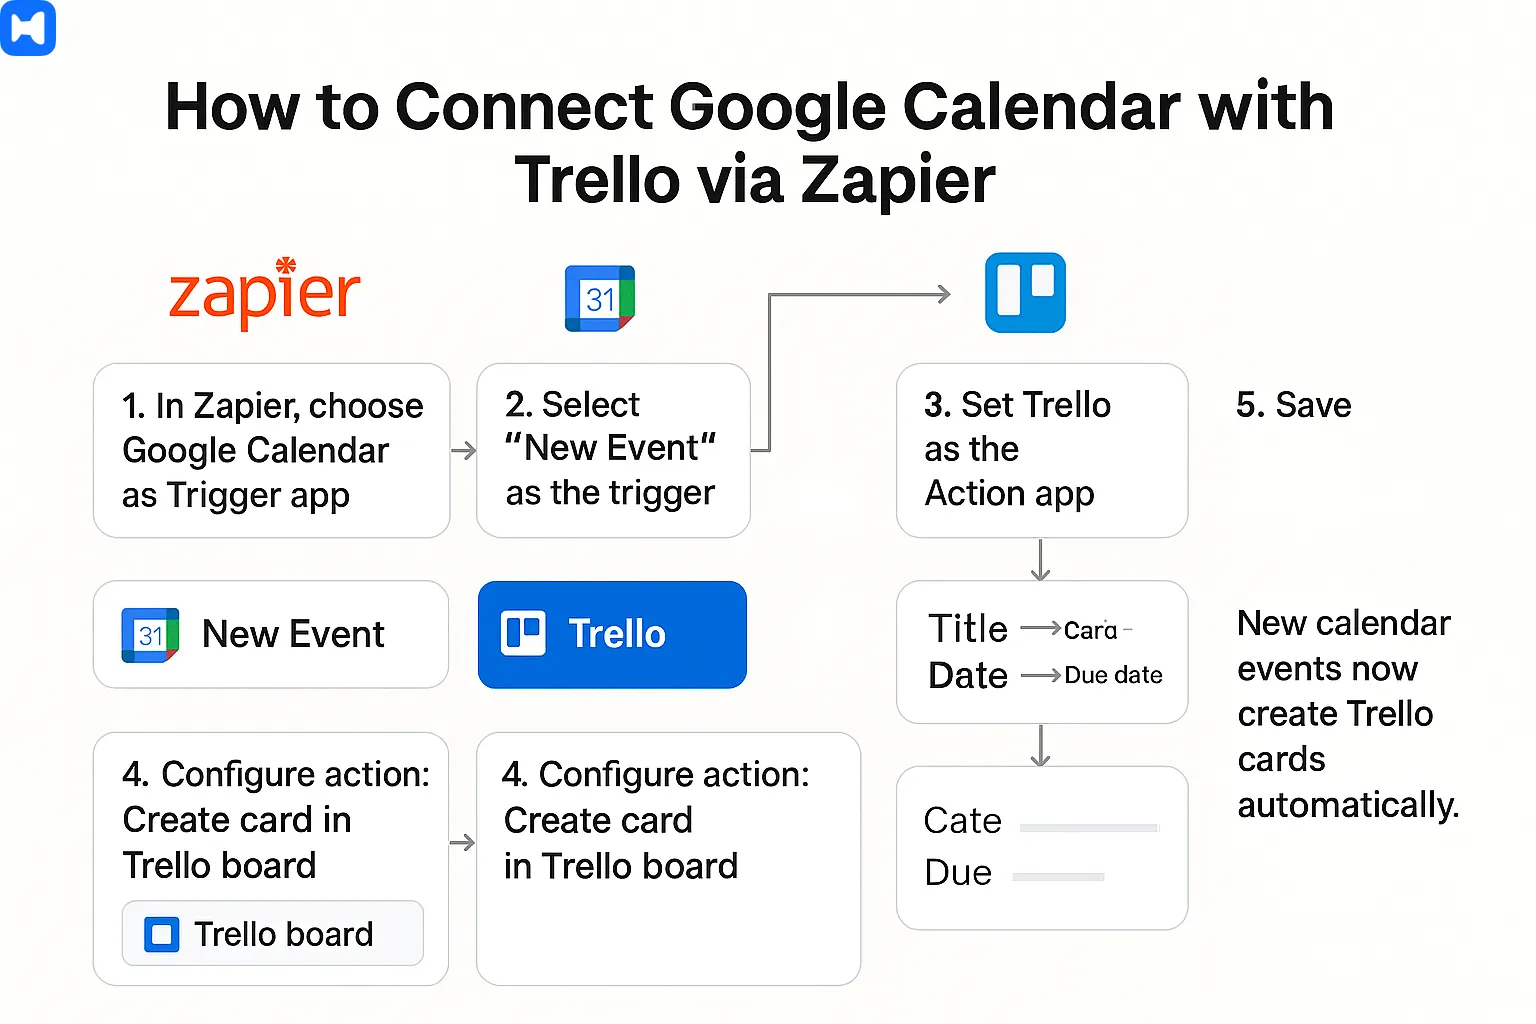
Step-by-step instructions (Google Calendar + Trello via Zapier):
- In Zapier, choose Google Calendar as trigger app.
- Select New Event as the trigger.
- Set Trello as the action app.
- Configure action, e.g., Create card in Trello board.
- Map event details (title → card title, date → due date).
- Save - new calendar events now create Trello cards automatically.
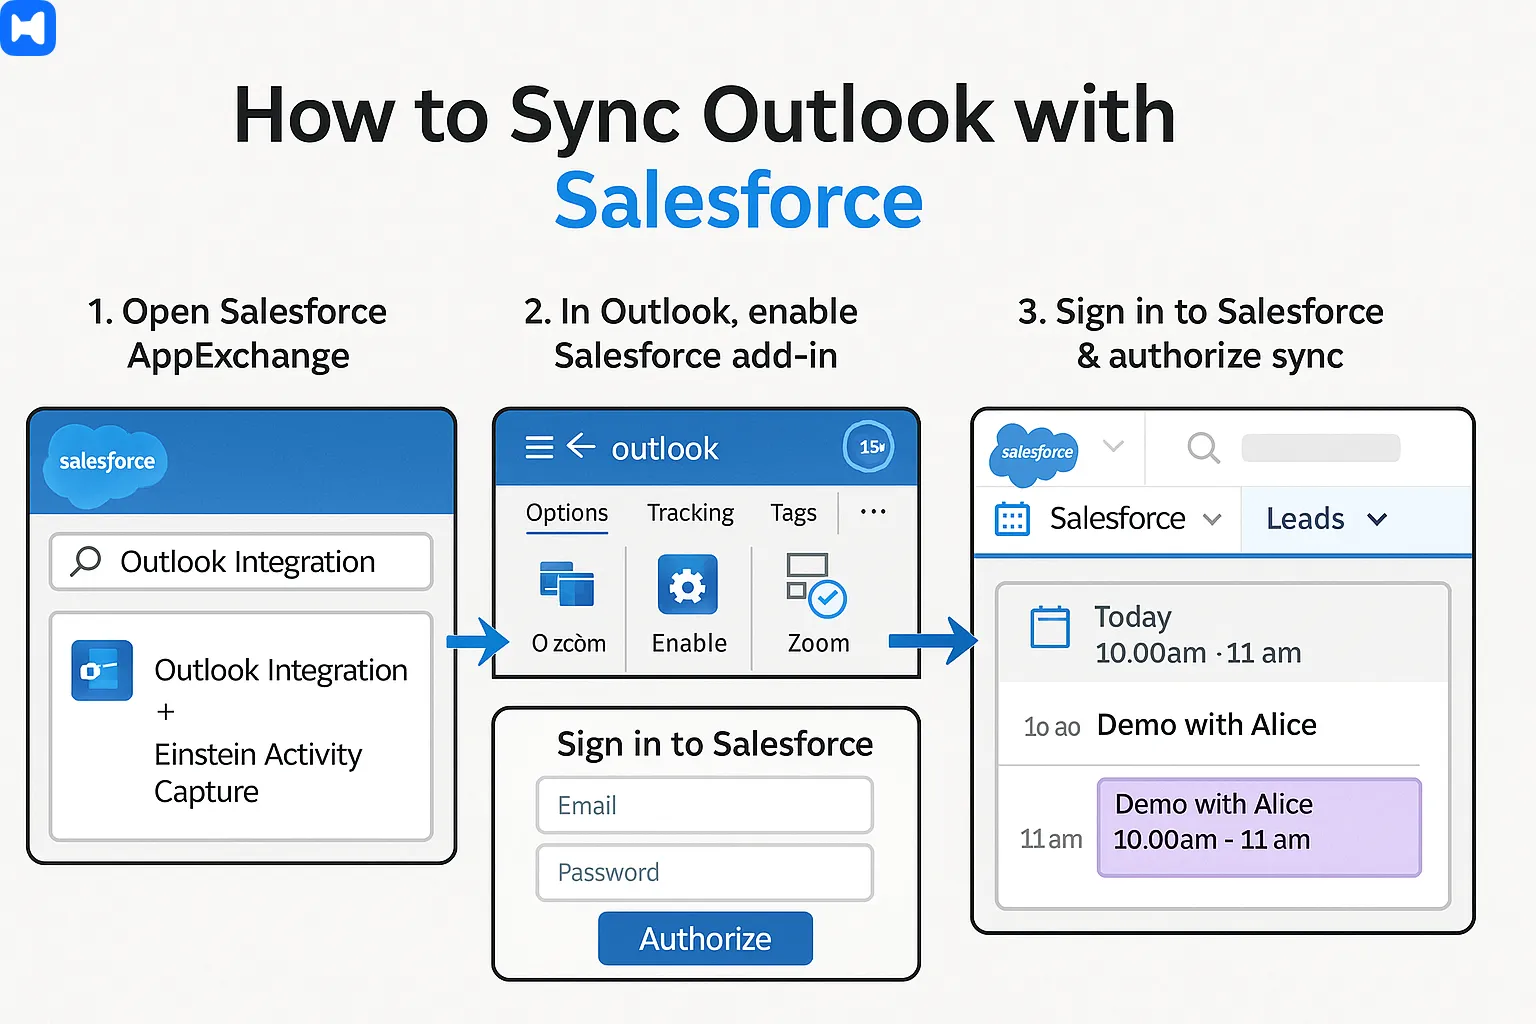
Step-by-step instructions (Outlook + Salesforce sync):
- Open Salesforce AppExchange and install the Outlook Integration and Einstein Activity Capture.
- In Outlook, enable Salesforce add-in.
- Sign in to Salesforce and authorize sync.
- Events scheduled in Outlook now appear in Salesforce under related leads or opportunities.
How do you troubleshoot common problems with shared calendars?
Troubleshooting shared calendars involves checking permissions, clearing caches, verifying sync settings, and enforcing governance policies.
Issues often arise from Exchange Online cache corruption in Outlook, sync delays in Google Calendar on Android/iOS, or outdated CalDAV/ICS subscriptions in Apple Calendar. Administrators use tools like Microsoft 365 Admin Center, Exchange PowerShell, or Google Workspace Admin Console to diagnose and fix errors.
Why is my shared calendar not syncing across devices?
Sync errors usually stem from disabled settings, cached data, or outdated synchronization protocols.
Step-by-step troubleshooting (Outlook desktop & mobile):
- In Outlook desktop, close the app and delete the local OST file to clear cache.
- Reopen Outlook and allow Exchange Online to rebuild sync.
- If the calendar still fails, re-add it via Add Calendar → From Address Book.
- On iOS/Android, remove and re-add the Microsoft 365 account with Exchange ActiveSync enabled.
- For enterprise users, IT admins can reset device partnerships in Microsoft 365 Admin Center.
Step-by-step troubleshooting (Google Calendar):
- Open the Google Calendar app on Android.
- Go to Settings → Select calendar → Enable sync.
- If issues persist, clear app cache in Android Settings → Apps → Calendar → Storage → Clear cache.
- On iOS, reinstall the Google Calendar app and ensure the shared calendar is checked in the app’s settings.
How do you fix calendar permission errors?
Permission errors are resolved by reapplying roles or adjusting domain-level sharing policies.
Step-by-step fix (Outlook/Exchange Online):
- In Outlook on the web, open the shared calendar.
- Go to Sharing and permissions, remove the problematic user.
- Re-add the user and assign the correct role (e.g., Editor, Delegate).
- If the issue persists, open Exchange Admin Center and run PowerShell commands:
– Remove-MailboxFolderPermission
– Add-MailboxFolderPermission with correct role.
Step-by-step fix (Google Workspace):
- In Google Calendar, go to Settings and sharing of the calendar.
- Remove the user from the list.
- Add the user again with the intended permission (free/busy, view details, edit, or manage sharing).
- In Admin Console → Apps → Google Workspace → Calendar → Sharing settings, verify domain-level restrictions don’t block the assigned role.
How do you resolve duplicate or missing events?
Duplicate or missing events are often caused by conflicts between ICS subscriptions and native sync, or by multiple devices overwriting entries.
Step-by-step fix (duplicates in Outlook):
- Disable third-party sync tools (if connected).
- Export the calendar to ICS via File → Save Calendar.
- Delete duplicates manually or by using Outlook’s Clean Up tools.
- Re-import the ICS file.
Step-by-step fix (missing events in Google Calendar):
- In the Google Calendar app, refresh the calendar manually.
- Check if the missing events belong to a calendar not enabled under Settings → Sync.
- If using ICS, verify that the source calendar is still published.
- Re-add the ICS subscription if necessary.
How do you fix time zone mismatches in shared calendars?
Time zone errors occur when device or calendar settings differ between platforms.
Step-by-step instructions (Outlook):
- In Outlook desktop, go to File → Options → Calendar.
- Verify the correct time zone under Time Zones.
- Enable Adjust for daylight saving time automatically.
- Re-sync the shared calendar.
Step-by-step instructions (Google Calendar):
- In Google Calendar web, go to Settings → Time zone.
- Set the correct primary time zone.
- Ensure “Ask to update my primary time zone” is enabled.
- Refresh mobile apps to apply changes.
How do you prevent oversharing of sensitive calendar details?
Use free/busy visibility, enforce DLP policies, and audit calendar permissions.
Step-by-step instructions (Microsoft 365):
- Open Microsoft 365 Admin Center.
- Navigate to Exchange → Organization Sharing.
- Set default external access to Free/busy only.
- Configure DLP rules to block sensitive keywords in event titles or attachments.
Step-by-step instructions (Google Workspace):
- In Admin Console, go to Apps → Google Workspace → Calendar → Sharing settings.
- Limit external calendar visibility to Free/busy only.
- Use Security → Data Loss Prevention to block sensitive information in calendar invites.
How do you remove calendar access for employees after offboarding?
Access must be revoked by removing users from calendars, groups, and accounts during offboarding.
Step-by-step instructions (Outlook/Exchange Online):
- In Microsoft 365 Admin Center, disable the user account.
- Remove the user from all Microsoft 365 Groups.
- In Exchange Admin Center, open shared calendar properties and remove the user from Permissions.
- Transfer ownership to a new delegate if required.
Step-by-step instructions (Google Workspace):
- In Admin Console, suspend or delete the user account.
- Go to Data migration → Transfer calendar events to reassign ownership.
- Remove the account from shared calendars manually.
- Verify that delegates and group memberships are updated.
How do you migrate calendars between Outlook and Google?
Migration is done with ICS export/import for individuals or enterprise tools like GWMME for large organizations.
Step-by-step migration (Outlook → Google):
- In Outlook desktop, go to File → Save Calendar.
- Save as an .ics file.
- In Google Calendar web, click + → Import under “Other calendars”.
- Upload the .ics file and choose the destination calendar.
Step-by-step migration (Google → Outlook):
- In Google Calendar settings, go to Export calendars.
- Download the .zip archive containing .ics files.
- In Outlook desktop, go to File → Open & Export → Import/Export.
- Choose Import iCalendar (.ics) and import into Outlook.
Step-by-step enterprise migration (Exchange ↔ Google Workspace):
- Use Google Workspace Migration for Microsoft Exchange (GWMME).
- Connect Exchange Online or on-premises Exchange.
- Map user mailboxes to Google Workspace accounts.
- Run migration to transfer all calendar events, preserving permissions and recurring series.
What are the best practices for using shared calendars effectively?
Best practices include clear naming, consistent color coding, appropriate permissions, and governance policies that ensure privacy and scalability.
Shared calendars work best when teams follow structured rules. Microsoft 365 and Google Workspace admins enforce governance through naming standards, auditing, DLP, and retention policies. Transparency is balanced with privacy by using free/busy access for external parties and detailed visibility internally. Adoption requires not only technical configuration but also training, etiquette, and change management.
How should you name and color-code shared calendars?
Calendars should be named for teams, projects, or resources and color-coded consistently to improve readability and avoid confusion.
In Microsoft 365 with Outlook, categories and labels allow assigning colors across calendars. In Google Calendar, each shared calendar can be given a unique color, synchronized across web and mobile apps. Apple Calendar in iCloud propagates chosen colors across macOS and iOS. Governance requires naming conventions such as “Team – Marketing”, “Resource – Room A”, or “Project – Q3 Roadmap”, ensuring scalability in large organizations.
Step-by-step instructions (Set naming & colors in Outlook):
- In Outlook desktop, right-click a calendar.
- Select Color, then assign a distinct hue.
- Rename the calendar in Properties → Name following organizational naming rules.
- Changes sync via Exchange Online and apply to Outlook web and Teams.
Step-by-step instructions (Set naming & colors in Google Calendar):
- In Google Calendar web, hover over a calendar name.
- Click the three-dot menu.
- Choose a custom color or create a new one.
- Rename the calendar under Settings → Name and description.
- Save - updates apply across Android and iOS.
What etiquette rules help reduce meeting overload?
Meeting overload is reduced by requiring agendas, limiting recurring events, respecting working hours, and using free/busy visibility.
Outlook integrates with Scheduling Assistant to detect conflicts, while Google Calendar offers “Working hours” and “Focus time” to prevent overload. Microsoft Teams and Slack send reminders and enforce buffer times. Governance frameworks recommend short meetings, mandatory agendas, and regular reviews of recurring events.
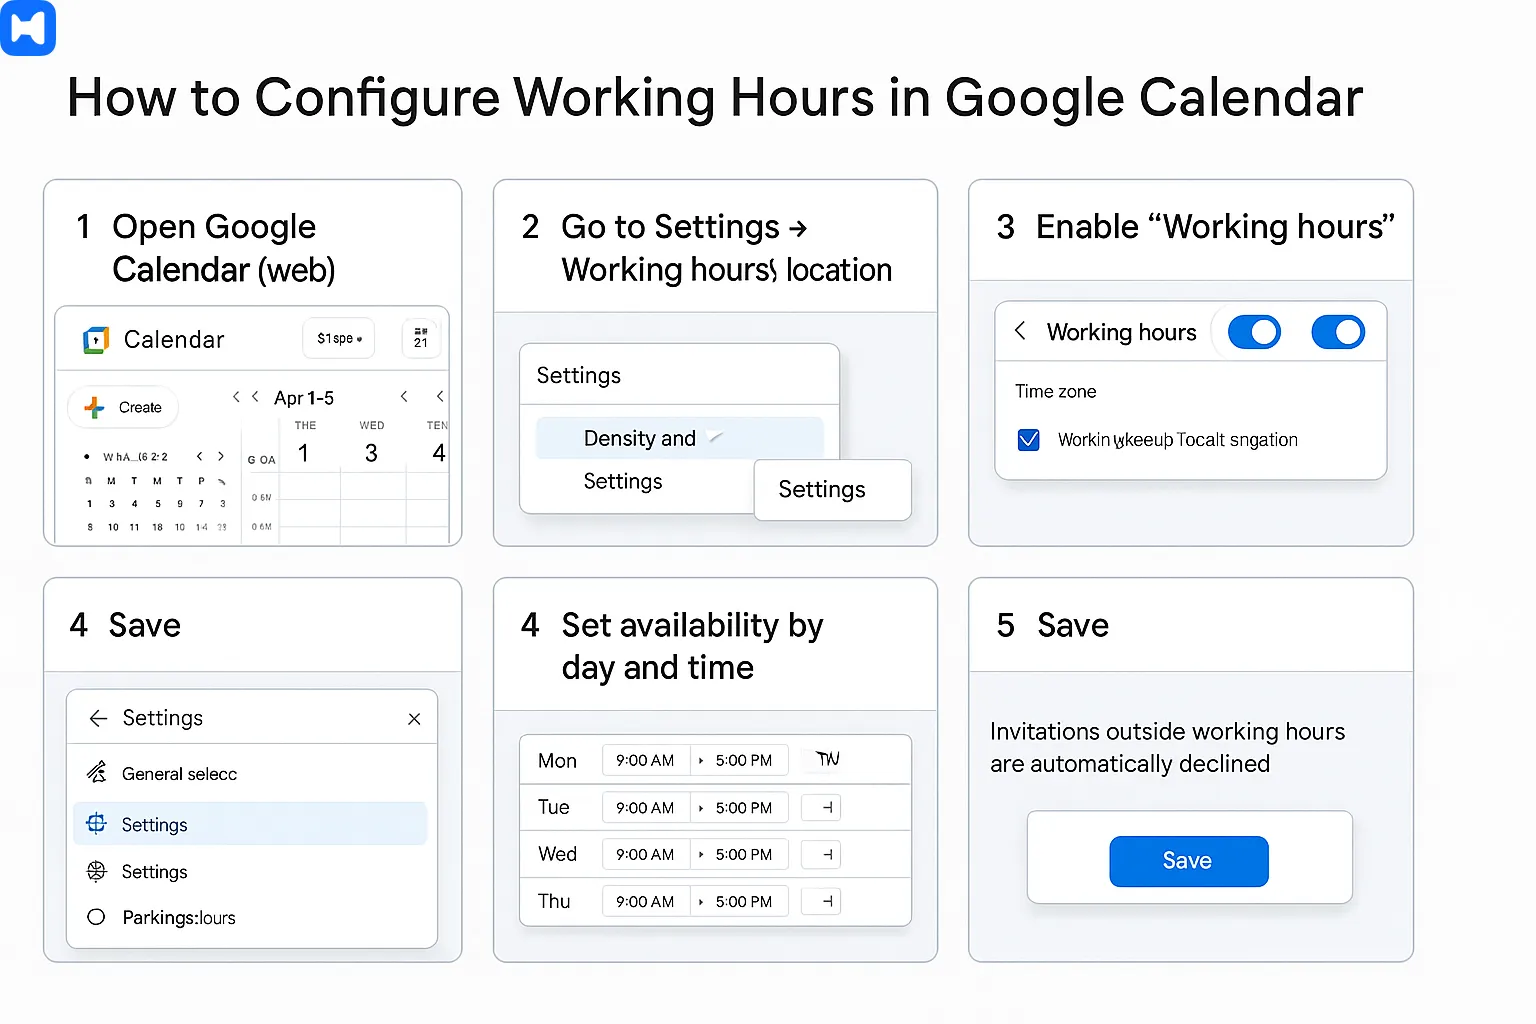
Step-by-step instructions (Configure working hours in Google Calendar):
- Open Google Calendar web.
- Go to Settings → Working hours & location.
- Enable Working hours.
- Set availability by day and time.
- Save - invitations outside working hours are automatically declined.
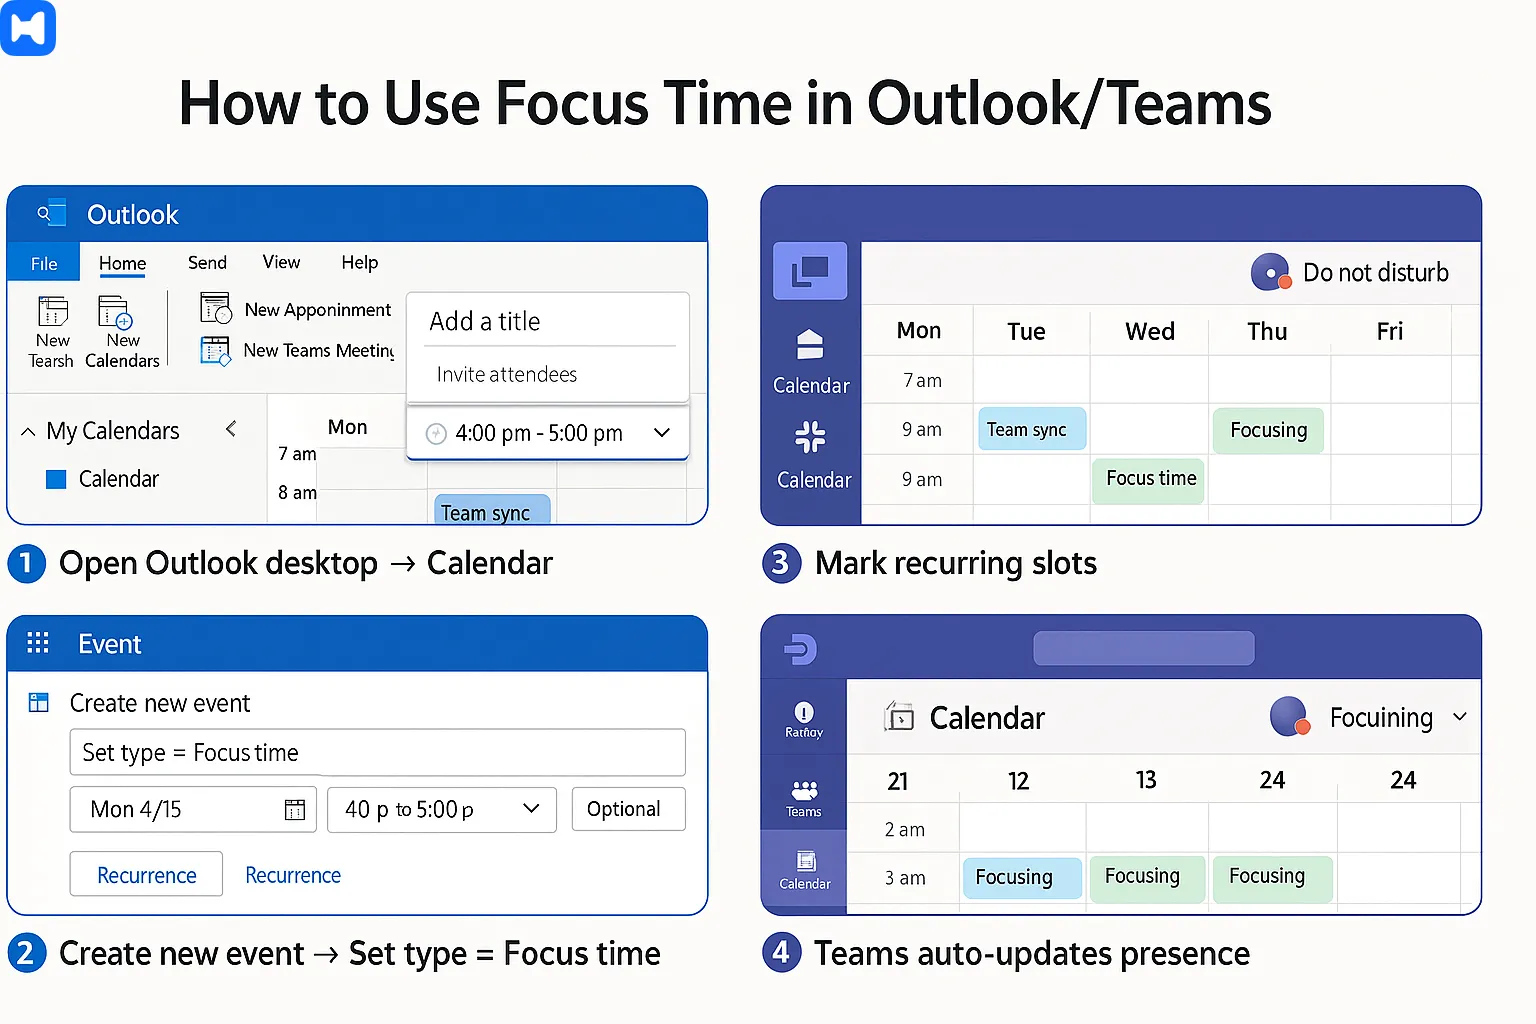
Step-by-step instructions (Use Focus time in Outlook/Teams):
- In Outlook desktop, open Calendar.
- Create a new event and set type as Focus time (if Viva Insights is enabled).
- Mark recurring slots for focus work.
- Teams automatically updates presence during focus blocks.
How do you measure adoption and success of team calendars?
Adoption is measured through analytics on usage, reduced conflicts, improved attendance, and alignment with governance policies.
Microsoft 365 Usage Analytics in Admin Center shows meeting load, conflicts avoided, and calendar adoption across Teams and Outlook. Google Workspace Admin Console tracks events created, RSVP rates, and cross-team sharing activity. Adoption metrics include the number of shared calendars actively used, reduction of no-shows thanks to reminders, and improved on-time delivery of project milestones. Scalability is proven when calendars support growing teams without loss of transparency.
Step-by-step instructions (Measure adoption in Microsoft 365):
- Open Microsoft 365 Admin Center.
- Go to Reports → Usage → Email & calendar activity.
- Review data on meetings scheduled, shared calendars created, and attendance rates.
- Export reports for analysis in Power BI.
Step-by-step instructions (Measure adoption in Google Workspace):
- Open Google Workspace Admin Console.
- Navigate to Reports → Apps → Calendar.
- Analyze data such as number of events created, invitations sent, RSVP responses.
- Export metrics for visualization or compliance reporting.


